Developing Hugo modules
Posted on July 21, 2023 • 11 min read • 2,312 wordsGuide on how to develop Hugo modules compatible with Hinode.

Introduction
Hugo modules provide a flexible and extensible modular framework. Hinode builds upon this framework by introducing core modules and optional modules to further streamline the build process and to minimize the final site assets. This guide helps to get you started with developing your own Hugo modules. It also explains how to take advantage of Hinode’s build pipelines to optimize the generated stylesheet and script assets. As a case example, we will set up a module that wraps the functionality of KaTeX - a popular math typesetting library. Be sure to comply with Hinode’s prerequisites first - this guide requires npm. We will also use Visual Studio Code (VSCode) for convenience - download your copy from the official website.
This is an inline $-b \pm \sqrt{b^2 - 4ac} \over 2a$ formula

This is not an inline formula:

$$x = a_0 + \frac{1}{a_1 + \frac{1}{a_2 + \frac{1}{a_3 + a_4}}}$$
$$\forall x \in X, \quad \exists y \leq \epsilon$$
This is an inline $-b \pm \sqrt{b^2 - 4ac} \over 2a$ formula
This is not an inline formula:
$$x = a_0 + \frac{1}{a_1 + \frac{1}{a_2 + \frac{1}{a_3 + a_4}}}$$
$$\forall x \in X, \quad \exists y \leq \epsilon$$Step 1 - Deciding upon the sourcing strategy
In this guide, we will develop a module to wrap the functionality of the KaTeX library. By wrapping this existing library, our Hugo module abstracts away from the technical details and provides intuitive access from within the Hugo ecosystem. Hugo modules uses Go modules under the hood to download the latest available release on GitHub, or the most recent HEAD of the default branch otherwise.
Hugo modules can include files for each of the following folders: archetypes, assets, content, data, i18n, layouts, and static. Hugo uses two different algorithms to merge the filesystems, depending on the file type:
- For
i18nanddatafiles, Hugo merges deeply using the translation ID and data key inside the files. - For
assets,content,static,layouts(templates), andarchetypesfiles, these are merged on file level. So the left-most file will be chosen.
Our module will wrap the functionality of KaTeX as a module for Hinode. The installation instructions of KaTeX tell us what files are needed to host KaTeX ourselves. We will need the file katex.js, katex.css, and the fonts directory. We could also use minified versions, however, Hinode will take care of transpiling, bundling, and minifying the assets later on. For our purposes, we are better suited with the properly formatted files to simplify debugging. We also want to include the auto-render extension. We will create a separate script with the instructions to invoke the function renderMathInElement later on.
When we take a look at the source code repository of KaTeX on GitHub, we can observe that not all required files are maintained wihtin the repository. This is quite common, as many libraries choose to publish their release assets through a package manager (such as npm) or CDN instead. The GitHub releases do adhere to a consistent semantic versioning pattern of vMAJOR.MINOR.PATCH. Both requirements are needed for Hugo modules to work out-of-the-box - that is, downloading the GitHub release directly.
Even if the first requirement has not been met, we can still use the Hugo module system. We will use npm to do some of the heavy-lifting for us. Our module will use npm and several scripts to expose the required files and to ensure these file are kept up-to-date. Now that we have decided on our sourcing strategy, we can head over to the next step to start working on our module.
Step 2 - Initializing the module template
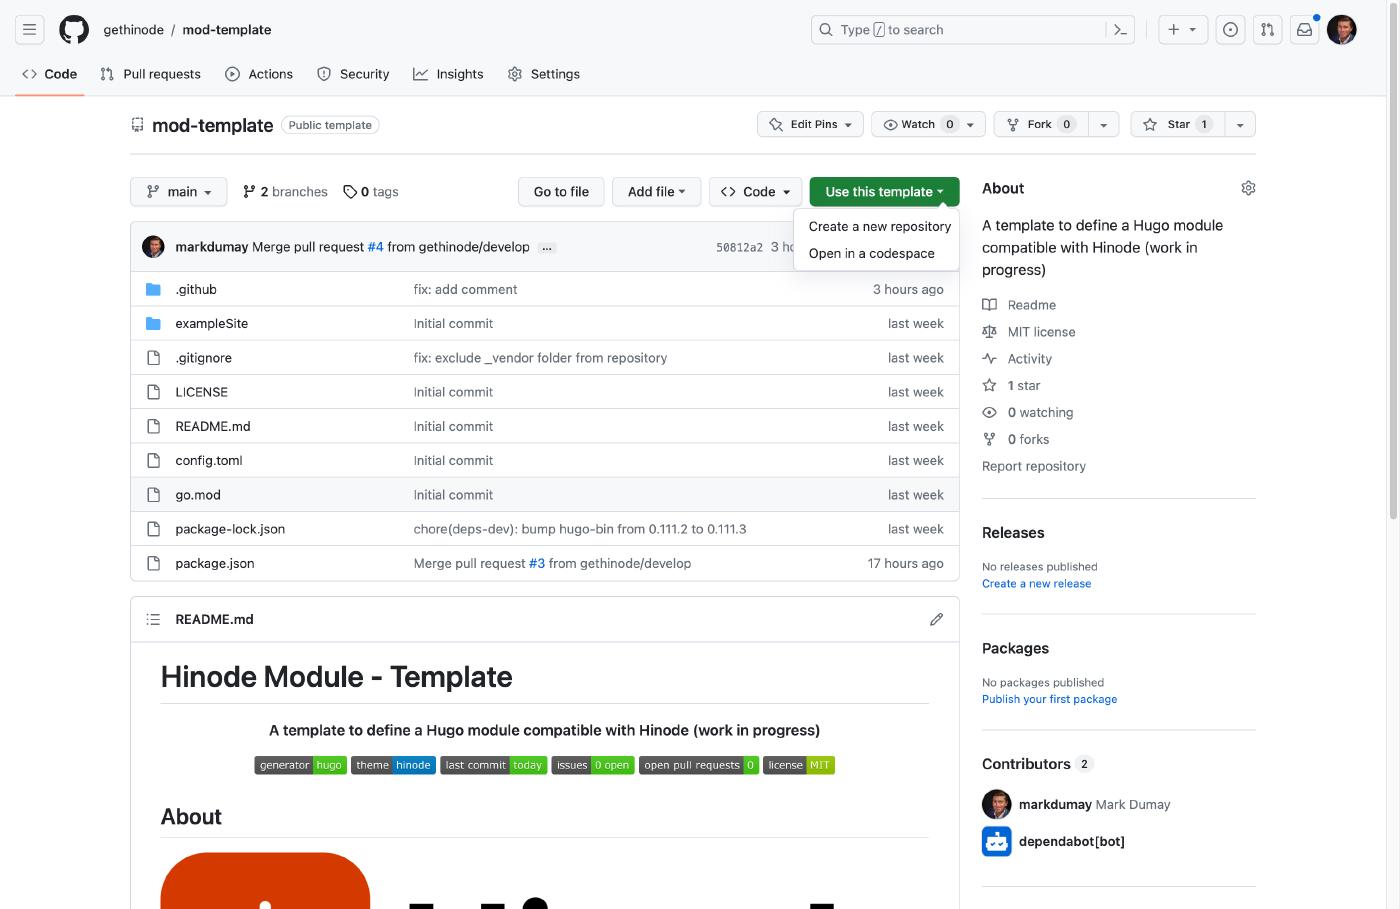
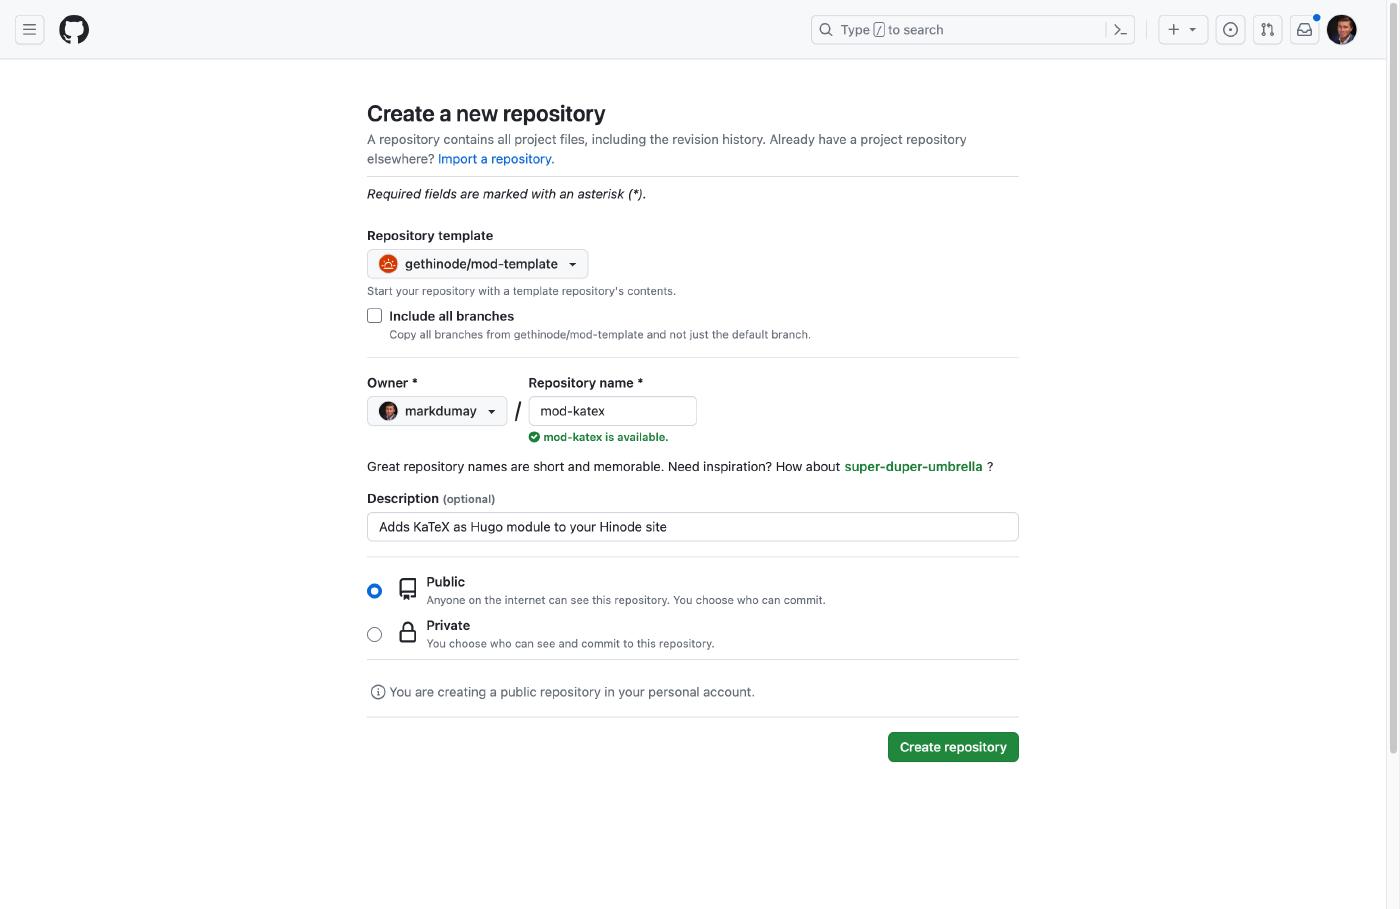
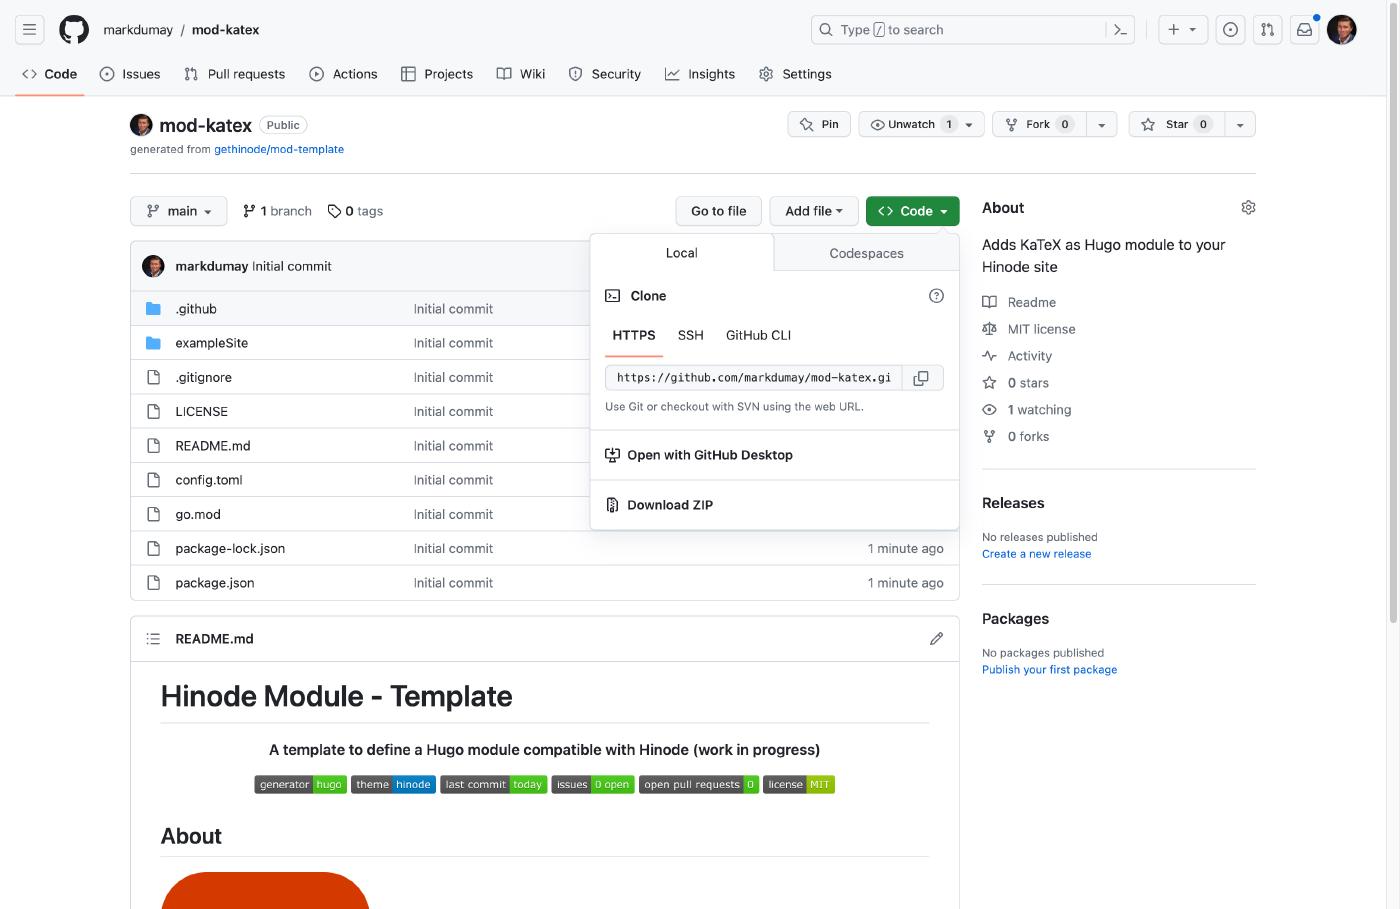
Hinode maintains a module template to quickly get you started with developing your own modules. Navigate to the repository on GitHub and click on the button Use this template. Next, fill in the repository settings such as the name and description, and click on the button Create repository. When GitHub has initialized the repository, click on the <> Code button and copy the remote git URL (https).
Now head over to the terminal of your local machine and initialize a local copy of the GitHub repository (replacing {OWNER} and {REPOSITORY}, or simply pasting the git URL your had copied earlier). This guide will use https://github.com/markdumay/mod-katex throughout the rest of the document.
git clone https://github.com/{OWNER}/{REPOSITORY}.git && cd {REPOSITORY}Open the local repository in VSCode and create a develop branch first. Now search for the keyword gethinode/mod-template and replace it with markdumay/mod-katex, except for the file package-lock.json - that gets updated automatically. Likewise, replace the remaining mod-template keywords with mod-katex. Feel free to adjust the files package.json and README.md as needed, such as updating the package description. Head over to source control, provide a commit message, and publish the develop branch to GitHub.
Step 3 - Exposing the KaTeX distribution files
We will now add KaTeX as npm package to our local repository. Run the following command from your terminal to add KaTeX as development dependency.
devDependencies in package.json.npm install -D katexSwitch back to VSCode and observe a new directory node_modules has been created in the repository root. The directory contains a folder katex, in which the subfolder dist contains our required files.
We will now create a postinstall script to copy the required files to our main repository (by default, node_modules are exluded from our git repository - see .gitignore in the repository root). The below extract of package.json shows the placeholder script predefined by the module template.
  [...]
  "scripts": {
    [...]
    "postinstall": "echo TODO: add postinstall instructions",
    [...]
  },
  [...]
Modify the postinstall script to copy the required files to a local dist directory:
  [...]
  "scripts": {
    [...]
    "postinstall": "npm run -s copy:css && npm run -s copy:js && npm run -s copy:contrib && npm run -s copy:fonts",
    "copy:css": "cpy node_modules/katex/dist/katex.css dist --rename=katex.scss --flat",
    "copy:js": "cpy node_modules/katex/dist/katex.js dist --flat",
    "copy:contrib": "cpy \"node_modules/katex/dist/contrib/*.js\" \"!node_modules/katex/dist/contrib/*.min.js\"  dist/contrib --flat",
    "copy:fonts": "cpy node_modules/katex/dist/fonts/** dist/fonts --flat",
    [...]
  },
  [...]
The line postinstall is split into separate lines for each copy command to improve readability (you could also use npm-run-all to simplify the command even further). Each copy statement uses cpy, a cross-platform copy command. The --flat argument instructs cpy to flatten the files in the destination directory dist. The negation pattern starting with ! tells cpy-cli to skip files that end with .min.js.
katex.css file to a katex.scss file. The default libsass library, part of the styles processing pipeline, has difficulty processing the file otherwise.Run npm install from the command line to invoke the postinstall script automatically. You should now have a folder dist in your repository root with the correct files. This npm script works well in a CI/CD pipeline as well, which prepares us for automation of the dependency upgrades later on in this guide.
npm install
> @markdumay/mod-katex@0.0.0 postinstall
> npm run -s copy:css && npm run -s copy:js && npm run -s copy:fonts
We will now expose the various files copied to our local dist folder using Hugo mounts. The below configuration adheres to Hinode’s conventions for the naming and paths of the exposed files. Also observe that we explicitly add the existing folders layouts, assets, and static as mount point. This is to ensure other mounts are merged with any existing directories, instead of these mounts replacing the local folders. Add this configuration to the config.toml file in your repository root.
[module]
  [module.hugoVersion]
    extended = true
    min = "0.110.0"
    max = ""
  [[module.mounts]]
    source = "dist/katex.js"
    target = "assets/js/modules/katex/katex.js"
  [[module.mounts]]
    source = "dist/contrib/auto-render.js"
    target = "assets/js/modules/katex/katex-autorender.js"
  [[module.mounts]]
    source = "dist"
    target = "assets/scss"
    includeFiles = "katex.scss"
  [[module.mounts]]
    source = "dist/fonts"
    target = "static/fonts"
  [[module.mounts]]
    source = 'layouts'
    target = 'layouts'
  [[module.mounts]]
    source = 'assets'
    target = 'assets'
  [[module.mounts]]
    source = 'static'
    target = 'static'
As a final step we will include a basic script to initialize KaTeX when the page loads. An example script is available on the KaTeX site. Create a file assets/js/modules/katex/katex-autoload.js and copy-paste the following script (copied from the KaTeX site for convenience). When done, push the latest changes to your remote git repository.
document.addEventListener("DOMContentLoaded", function() {
    renderMathInElement(document.body, {
      // customised options
      // • auto-render specific keys, e.g.:
      delimiters: [
          {left: '$$', right: '$$', display: true},
          {left: '$', right: '$', display: false},
          {left: '\\(', right: '\\)', display: false},
          {left: '\\[', right: '\\]', display: true}
      ],
      // • rendering keys, e.g.:
      throwOnError : false
    });
});Step 4 - Testing the KaTeX markup
The module template provides a simple website for local testing. Open the file exampleSite/hugo.toml and update the configuration:
[module]
  replacements = 'github.com/markdumay/mod-katex -> ../..'
  [[module.mounts]]
    source = "static"
    target = "static"
  [[module.imports]]
    path = "github.com/markdumay/mod-katex"
  [[module.imports.mounts]]
    source = "dist/katex.scss"
    target = "static/katex.css"
  [[module.imports.mounts]]
    source = "dist/fonts"
    target = "static/fonts"
  [[module.imports.mounts]]
    source = "dist/katex.js"
    target = "static/js/katex.js"
  [[module.imports.mounts]]
    source = "dist/contrib/auto-render.js"
    target = "static/js/auto-render.js"
  [[module.imports.mounts]]
    source = "assets/js/modules/katex/katex-autoload.js"
    target = "static/js/katex-autoload.js"
The replacements instruction tells Hugo to source the mod-katex module from the parent folder instead of the remote repository. This is of great help for local development and testing, as we would otherwise need to synchronize our repositories, submit a PR, and pull the latest version for each revision. The next line instructs our example site to use the mod-katex module (now sourced locally) and to adjust the mount points of the .css file and .js files. In this simple site for testing, we have no need for complex processing or bundling of assets, so we can use static imports instead.
We will now run the mod:update script to install the Hugo module(s) and to check for any updates. The package.json contains several scripts to help us:
  [...]
  "scripts": {
    [...]
    "mod:update": "hugo mod get -u ./... && npm run -s mod:vendor && npm run -s mod:tidy",
    "mod:vendor": "rimraf _vendor && hugo mod vendor",
    "mod:tidy": "hugo mod tidy && hugo mod tidy -s exampleSite",
    [...]
  },
  [...]
hugo mod get -u ./...Checks for any Hugo module updates recursively (including subfolders such as
exampleSite)rimraf _vendor && hugo mod vendorStores the module assets in a local vendor directory instead of the system cache. This is required if a module uses other modules itself (so-called transitive dependencies) and ensures our example site has access to them. Another reason to vendor your modules is to aid additional tools, such as the Purgecss Whitelister. External tools do not have access to Hugo mounts, however, might require access to module files. Vendoring your modules ensures all module data is available on a local, known path.
The
_vendordirectory is deleted to prevent an error when the module does not have transitive dependencies. You could remove the vendor approach in this case, however, the current scripts defined by the module template cover both scenarios.hugo mod tidy && hugo mod tidy -s exampleSiteDo some housekeeping of the
go.modandgo.sumfiles in both the main repository andexampleSitefolder. The commandhugo mod tidydoes not have a recursive option, so instead we invoke it the second time with the-sargument to point it at the correct subfolder.
Run the command npm run mod:update to update the modules recursively.
npm run mod:update

> @markdumay/mod-katex@0.0.0 mod:update
> hugo mod get -u ./... && npm run -s mod:vendor && npm run -s mod:tidy

Update module in [...]/mod-katex/exampleSite
Update module in [...]/mod-katex
We will now adjust the file baseof.html in exampleSite/layouts/_default to include our static stylesheet and script on each page by default. Modify lines 7 and 13 as follows:
| |
Finally, add some examples to the file exampleSite/content/_index.md:
This is an inline $-b \pm \sqrt{b^2 - 4ac} \over 2a$ formula

This is not an inline formula:

$$x = a_0 + \frac{1}{a_1 + \frac{1}{a_2 + \frac{1}{a_3 + a_4}}}$$
$$\forall x \in X, \quad \exists y \leq \epsilon$$
Start a local server for the example site with the following command. Navigate to the address in your local browser and verify the page loads correctly.
npm run start

> @markdumay/mod-katex@0.0.0 prestart
> npm run clean && npm run mod:vendor

> @markdumay/mod-katex@0.0.0 clean
> rimraf exampleSite/public exampleSite/resources

> @markdumay/mod-katex@0.0.0 mod:vendor
> rimraf _vendor && hugo mod vendor

> @markdumay/mod-katex@0.0.0 start
> hugo server -s exampleSite --bind=0.0.0.0 --disableFastRender --printI18nWarnings

Start building sites …
Environment: "development"
Serving pages from memory
Web Server is available at http://localhost:1313/ (bind address 0.0.0.0)
Press Ctrl+C to stop
Conclusion
We have now created a new module that wraps the functionality of KaTeX. You can now easily include the module as core module or optional module in your Hinode site. Visit the modules section for more instructions. As a next step, you could consider to automate the dependency tracking, merging, and publication of new releases for your module. Your module already inherited several workflows from the module template. Visit the module development section for more information.


